
Principle: Save seeds
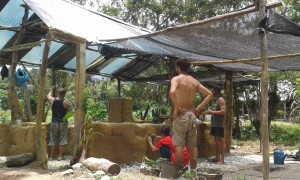
A nursery is a structure designed to help propagate and care for young plants. The structure also helps to save and store seeds and prepare fertilizers. It provides protection from heavy sun and rain and other weather while roots grow. You can plant plants or seedlings directly in a garden, however starting seeds in a nursery raises a plants survival rate.
Large agricultural companies have started patenting seeds reducing the number of available organic, local seeds all over the world. But at the same time, more communities are starting local seed banks and helping new farms get started. It is important for people have access to organic, heirloom seeds so we can continue the practice of farming.
The nursery seems to be the bedrock of the farm. A good nursery, leads to good immature plants, which leads to a more productive garden. Properly managed nurseries appreciate in value and help create surplus, and in turn, profit. With little up-front investment and consistent labor, the seedlings that mature in the nursery speed the growth of your own garden, and can be sold or given away to help start others.
Nursery elements

Greenhouse or Covered Grow Area
A greenhouse is a building in which plants are grown. In cold weather, greenhouses provide a controlled environment to grow plants. In more tropical areas, a covered grow area protects seedlings from heavy rains. Greenhouses provide a centralized place to start growing seeds. Check out Growing Under Glass for a good reference to greenhouse construction.
It is good to position a nursery near a compost area for easy access to good soil. In cold climates, you can put your compost pile or even keep small animals, inside your nursery to retain heat in cold months.
Polytunnel
Greenhouses can be any shape or size. One design is called a polytunnel or ‘hoop house’. This dome shaped structure uses pvc, bamboo or other material to form a hoop or a tunnel. The structure is then covered with a sheet of plastic. Polytunnels can be 5-6m wide, 8-10m long, as a general reference for size.
A geodesic dome is another type of shape, which can be modified to make a greenhouse. Go to www.desertdomes.com for a dome calculator.

Potting Soil
Before you can plant, you will need potting soil. Potting soil is useful for cuttings (in bags) and sowing seeds (in seed trays). To make potting soil:
- Dry sand and compost in the sun then use a screen or other fine wire mesh to sift the fine particles
- Mix equal parts of sifted compost, sifted sand and humus (coconut fiber, sawdust, chopped straw, fine woodchips – mulch material)
- Use more sand the smaller the seeds are.
- Note: Do not use clay or ground soil in potting mix. Clay prevents drainage and ground soil is too mixed up. You want good drainage.

Seed saving basics
Seed saving is a great way to develop seed-lines that are well adapted to a particular environment. Saving seeds from the healthiest plants year after year enables growers to select for traits that are most suitable for their growing conditions. Following are the four basic steps to saving seeds:
- Choose seeds to save
Plants can be divided into two types of pollinators: self-pollinated and wind/insect pollinated:
- Self-pollinating plants, like tomatoes, peppers, beans, lettuce, peas and broccoli are the easiest to save seed from because they rarely cross-pollinate. Self-pollinating seeds that are biennial crops, such as carrots and beets are harder to save since they need two seasons to set their seeds.
- Wind or insect-pollinating plants, including cucumbers, melons, corn, pumpkins, gourds, and squash. These plants readily cross-pollinate.
- Collecting seeds
Some notes on collecting seeds:
- Take seeds from the healthiest-looking plants.
- Allow the seed to reach full maturity before collecting.
- Mature seeds usually have a hard seed coat or a darkened color.
- Once ripe, pick and dry the seed as soon as possible. Seeds contained in a pod or husk should be left to dry on the plant.
- Cleaning seeds
Seed cleaning methods can be divided into wet-processing and dry-processing. To clean wet processed seeds:
- Cut open fruits and scrape out seeds. Place seeds, pulp and juice from the fruits in a bowl with a cockroach (yes) or other dead insect. The insect helps the seeds to ferment and eliminate seed-borne diseases that can affect the next generation of plants.
- Place seeds in a large bowl or bucket. Rinse.
- Add water and stir mixture. Good seeds will sink to the bottom, while poor quality seeds are more likely to float.
- Pour the seeds into a strainer and washed under running water.
- Dry the cleaned seeds by spreading as thinly as possible on a flat, dry surface such as a glass or ceramic dish, cookie sheet, window screen, or piece of plywood.
- Shuffle the seeds a few times a day as they dry.
To clean dry-processed seeds:
- Separate seeds from husk, flower head or pod. Seeds that are in pods, may need to be smashed.
- Place seeds on screens with a wire gauge small enough to prevent seeds from passing through. Coffee filters allow for excellent air circulation.
- Leave in the sun to dry. Make sure seeds are protected from wind and the elements. Source: oregonstate.edu/sfn/su09Seedbasics
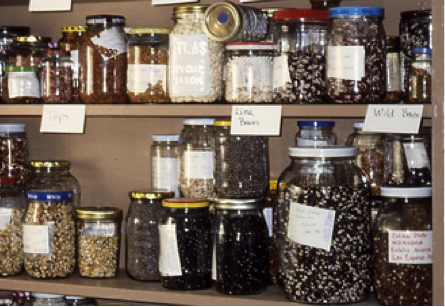
- Storing seeds
Once seeds have been cleaned and dried, place them into a clean, airtight container like a glass jar, plastic container or plastic bags. Leave in a cool, dark place. Make sure to label all seeds. Basements or refrigerators are good locations – the colder the better. You want an environment that keeps seeds dormant – note: opposite conditions to what is necessary to make them grow (webgrower.com/information/save_seeds.html).
What is plant propagation?
Propagation is a method to increase or rapidly multiply plants. Plant propagation maintains the genetics of seeds. There are two general methods of plant propagation:
- Sowing seeds – Sexual
- Benefits: Grow many plants, less chance of transferring disease, gives opportunity to select traits, transport
- Drawbacks: Takes a long time to mature, not true to the type
- Propagating tips: Sow seeds 2-3x deeper than width
- For very small seeds, mix with sand to apportion into seed trays
- Beans, peas, pumpkin seeds – plant directly into the ground
Buying seeds: Check out these organic seed online distributors to start your own garden or nursery: www.SeedsofChange.com, www.Seedman.com, www.Seedshop.com, www.Seedsnow.com, www.Botanicalinterests.com, www.Seedsavers.org.
- Vegetative – Asexual (cloning)
- Benefits: True to type (exact replicate, clone), reaches maturity faster, propagates plants that are difficult to grow from seed.
- Drawbacks: Needs more space, transfers disease easier
Cutting
Some types of plants can be propagated by simply cutting and replanting branches. First, find a decent sized branch. Look for a branch between the size of a pencil and the size of your index finger. It’s good to cut a branch at least 15cm long, or you can cut a long branch and make additional cuttings from that. Cut on an angle, just below the node, the place where a new stem grows. Leave 1-2 leaves when you cut the branch. Paint the tip with honey to stimulate growing. Replant in moist compost immediately.
Here are a few examples of plants you can propagate by cuttings:
- Root (guava, breadfruit, comfrey)
- Leaves (succulents, Brazilian spinach)
- Soft-tip (softwood, pinto peanut)
- Brown/green branches (hardwoods, lucaena, mulberry, taro)
Layering
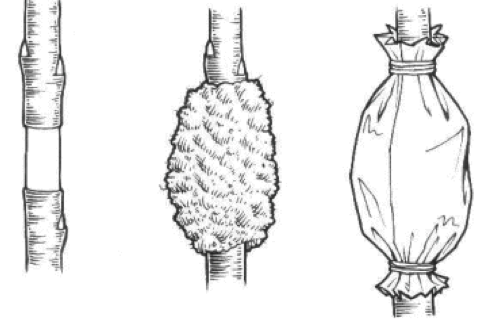
Air layering
Air layering is a form of propagation where you wrap a plastic bag filled with compost on a tree and sprout new roots in the air. Mulberry trees, among other types of trees propagate via air layering. To properly air layer a plant:
- Find a branch you want to air layer, choose a branch about the size of your finger. Find an internode, the place on the branch between nodes (nodes are where new branches grow)
- Slice the outer layer of bark about 5cm long, peel away the bark
- Wrap the exposed wood with compost at 50% moisture, coconut husk, moss and or clay, wrap in a plastic, then in aluminium foil to not let in light, tie ends of bag
- Let grow for 8-10 weeks or when roots poke through the foil
- Cut the new branch just below roots, replant immediately
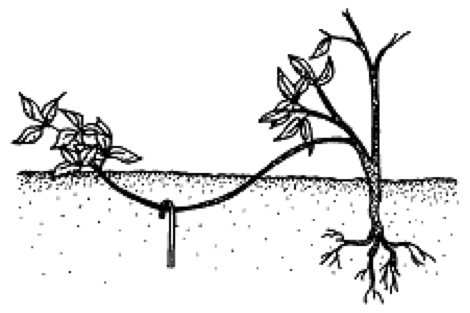
Ground layering
Ground layering plants send runners through their drooping branches that climb along the ground and shoot roots into the ground. This type of layering can be done on most plants with low-growing branches. Some examples ground layering plants include climbing roses, forsythia, rhododendron, honeysuckle, boxwood, azalea, and wax myrtle. Ground layering can be accomplished by:
- Bending a low growing, flexible stem to the ground. Cover part of it with soil, leaving the remaining 15-30 cm above the soil,
- Bend the tip into a vertical position and stake into place. The sharp bend will often induce rooting.
Division
Here are steps to propagation by division:
- Dig the plant up when flowers have faded,
- Shake the soil from the roots,
- Break the plant into several pieces at the nodes or between leaves. The important thing is to make sure each divided piece has shoots and roots on it.
- Replant immediately in good soil in a pot or sheltered garden bed and water thoroughly.
Here are a few examples of plants that propagate by division:
- Runners –Pull apart and plant (grass, mint, strawberry)
- Suckers – Pull and plant, like sand (succulents, banana, cactus)
- Bulbs/korum – Pull apart and plant whole (garlic, onion, tulips, taro)
- Rhizome/tuber – Plant directly (ginger, turmeric, galangal, potato)
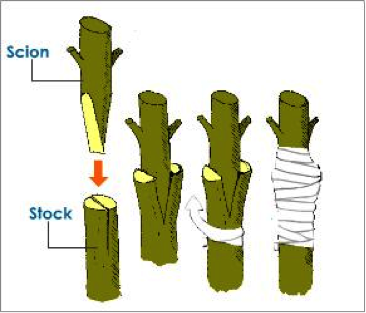
Grafting
Grafting is another way to propagate plants. It is a bit more complicated, so do some research. Below is a sketch of how to do a particular type of graft.