Principle: Provide housing for people and animals
Natural building uses primarily local and natural materials to construct durable structures. Some examples of natural building materials are earth, made into adobe bricks or cob, bamboo, straw bale, wood or stone. Oftentimes building with natural materials can cost a fraction of the price of modern homes and utilize unwanted or undervalued materials from your community.
What are the elements of a natural building? A natural building should:
- Be weatherproof from wind, rain and natural disasters
- Be affordable by the people who live in it
- Use primarily natural or locally-sourced materials
- Have all required amenities (bedrooms, a toilet, shower, water) to comfortably accommodate its intended inhabitant
- Design using ecological design techniques
Natural building techniques
Earthen building materials
Earth has been used as a building material throughout human history. In the last 150 years, cement and other modern building materials became more desirable among the general world population. But many people now are building with earth, including people who can afford a modern concrete home. Building with earth is incredibly flexible, easy and cheap.
Earthen materials have thermal mass. Materials with thermal mass absorb and retain heat during the day. At night, when the temperature cools down, earthen materials slowly release the heat into the house. Strawbales (later in the chapter), on the other hand, have high insulation value, meaning they reflect a change in temperature, like a mirror. Strawbale structures have very good insulation and work well in temperate climates.
Building with earth is also recyclable. If you wanted to rebuild your earth home years after building it, you can knock the wall down and use the material from the old wall to rebuild. Just add water, turn it back into mortar and remold the bricks.
Clay, sand and fiber – The building blocks
Clay, sand and fiber are the elements of earthen building. Each of these three materials play different roles to create a very strong building material. To visualize the role of each component: think of the sand as the stone – or major building block. The clay acts as cement, binding the building material together. Fiber is the rebar, or reinforcing steel. Here is more information about each component of earthen building:
Sand – Aggregate
Particle size: 2mm – .06mm (15-500x bigger than clay particles)
Sand is a loose granular substance formed from the erosion of rocks. Sand particles are round and rigid. They make up the bulk of the substance of a wall. Sand provides strength, stability and reduces cracking in a wall.
Clay – Glue
Particle size: .002mm or less
Clay expands and contracts in size. Clay is the glue or cement of earthen mortar. It holds the mud together and sticks to the wall.
Fiber – Rebar
Fiber acts as the bones or structure of earthen materials. It is normally a dry organic material. Common types of fiber are rice husks (for bricks and mortar), straw or dried grass (for cob).
Earthen mortar
Earthen mortar, the base material of earth building, is a mixture of sand, clay and fiber. When mortar dries, it creates a very strong, rock hard, fireproof, well-insulated material.
To make earthen mortar, mix clay (15-50%) and sand (50-85%) together. Add water. Mix to even consistency. Add short fiber, like rice husks if you are using it as a rough plaster or adobe bricks, or use long fibers (like dry straw) if you’re making cob. You want enough short fibers so it scratches your hands or feet but is still predominantly mud. Mix until the fiber is completely covered with mud.
The recipe for mud is flexible. Aim for a consistency of peanut butter, sticky but not too sticky. If it’s too sticky, it has too much clay and will crack once it dries. Add more sand. If it’s not sticky enough, it won’t stick to the wall. Add more clay. Once you work with mud a few times and observe the results, you’ll get a feel for what good mud feels like. Just remember, it’s not an exact science and doesn’t need to be.
Soil tests
People commonly buy truckloads of sand and clay from local construction companies. In Thailand, a truckload of sand or clay costs about $15. This is an easy, cheap way to get an even mix of earthen materials. You can also use the soil at your site for earthen building. Here are a few tests you can do to determine whether your soil is good for building:
Sight test – Examine the texture of the soil to determine what it is made of. Rub it between your fingers to observe how it feels.
- If it’s shiny, it has more clay
- If it’s dull, it has more silt, find another material for building (see Soil chapter for more info on silt)
- If it’s grainy, it has more sand
Jar test – Fill jar with soil (40%), mix with water (60%), shake vigorously, let settle for 24 hours. The separated layers give rough proportion of type of soil
- Sand particles will be the bottom layer, will settle in a few minutes
- Silt particles will be in the middle, will settle in a few hours
- Clay particles will be on top and can take up to 24 hours to separate
- Organic matter will float or fall on surface
Testing soil in jars is as simple as looking at a glass jar
No matter where you source your soil, once you start making mortar mix you need to determine whether it’s well balanced. Here are a few methods to determine whether the mortar has enough sand and clay.
Hand test
- Put some mud in your hand. Slowly turn your hand over. The mix should slowly peel off as you tilt your hand. If you turn your hand over and it sticks, add more sand.
- Peanut butter is a good example of a good consistency.
Experiment with it
- Put it on a wall. If it sticks and doesn’t crack, it’s probably okay. If it cracks, you used too much clay, so add another layer of plaster heavy on sand. If it doesn’t stick, you used too much sand. So add clay and then reapply.
- Overall good mortar mix is one with enough clay so it will stick to the wall and enough sand so it won’t crack.
Mixing mortar
Mud pit
The most common way to mix mud is in a mud pit. Dig a hole, as big as you want and mix in amounts of sand, clay and fiber. It may be easier to mix the sand and clay first, then add water. Mix well with your feet and hands. Then add fiber. Add water until you get a nice consistency.
Tarp
This method works if you have a smaller amount of mud to mix or if you want to stay clean. Lay out a tarp. Put the sand, clay and fiber (once sand and clay are mixed) in the middle. Then pull the edges of the tarp back and forth. Then stop and massage the mud with your hands. Repeat until ready.
Cement mixer
A cement mixer is a great machine for mixing cement. It goes light years faster (hours, actually) compared to the other two methods. Once you find a good recipe (it will differ with all types of soil, make a few batches and observe results) dump the sand and clay in first. Let the machine run about 2 minutes. Add fiber. Then add water until you reach a good consistency. For general appreciation factors, it is recommended to use the cement mixer only after you have mixed mud with your feet.
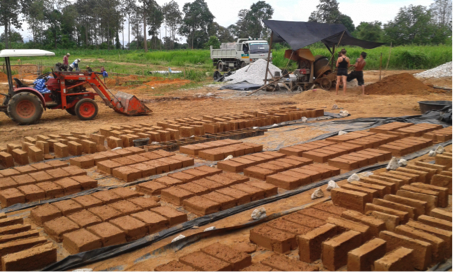
Adobe bricks
Adobe is the Spanish word for mud brick. Adobe bricks are sun-dried mixtures of earthen mortar, often using rice husks as the fibrous material. Building with adobe bricks creates thick, thermal, load-bearing walls.
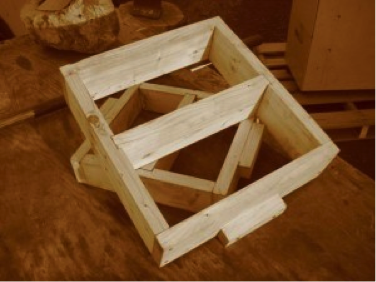
To make adobe bricks, first make a brick mold out of wood or other similar material. Common brick sizes are 10cm x 20cm x 40cm (standard size) or 5cm x 10cm x 20cm. These are square numbers so it makes it easy to break bricks and fill gaps as you build. When making your form, make the inside dimensions of the form measure the exact dimensions you want your brick to be.
Once you make the earthen mortar, pour it in the brick form then remove the form. If the mortar is a good mix, the bricks will stand alone. If the form sticks to the bricks, the form may be too dry. Wet and wash the form. If the brick slumps and the sides poof out the mix is too wet. Add more earthen material.
Once made, let the bricks dry in the sun for about week – turn the bricks once after 3 or 4 days. The bricks become lighter in color as they dry. If there is a chance it will rain, cover the bricks. Rain is not good for adobe bricks. When dry, store the bricks in a covered area by stacking them on top of each other.
When building with bricks, use wet rice-husk mud as the mortar to lay the bricks. Once you complete a wall, you can use the same mortar again to make a rough coat of plaster (see natural plastering below). An adobe brick wall is solid because it’s the same material – in the brick, the mortar and the plaster.
Cob
Cob is clay and sand mixed together, strengthened with straw. Cob uses more clay than mortar. About 70:30, clay: sand ratio. First mix the clay and sand until it is a good consistency. Then knead the straw into the mortar so the mortar covers all parts of the fiber.
Before making cob, you can soak the straw in water. This will make the straw easier to work with. You can use the cob right away or let it soak in water overnight. The longer the cob mix sits, the stickier it becomes. If it starts to smell (after a week or so), that’s good. It will make a stronger bond on the wall once it dries.
When you pull the cob from the mud pit, grab a bundle of straw about the thickness of your wrist and make “dreadlocks”. These long strands of cob allow you to wrap around posts, fill in a wattle (see below) or easily mold into a small brick or “loaf” to build a wall.
Wattle and Cob
Wattle and cob is a simple way to build fences or walls using cob. You can make virtually any shape of any building using wattle and cob. A wattle is a lightweight frame to wrap cob around. Wattles are often made out of strips of wood or bamboo. When cob is wrapped around each part of the wattle, it forms a strong, non-load bearing structure with all of the beneficial properties of earthen materials.
How to build with wattle and cob
- First make a wattle, a lightweight frame, out of bamboo or wood. The frame material should be dry. You could tie the frame together with wire or twine.
- Wrap cob around the wattle. Cover the entire frame with dreadlocks. The more knots and overlapping of cob you can do, the stronger the wall will be.
Natural plastering, painting and sealants
Plastering, also called rendering, adds a layer of protection to a wall. Natural plaster material is the same magical material as mortar and adobe bricks – clay, sand and fiber. Many earth buildings apply two coats of plaster – a rough coat, using small fibers like rice husks to fill in the cracks in the wall, and a final plaster, using finer fibers like chopped rice straw. Two coats provide more protection for the walls. Other notes on plasters:
- The final color of the plaster will be the color of the soil used,
- Termite mounds are made of good clay material for plaster,
- To get a more sticky mix that won’t crack, mix manure, flour or egg whites into the mortar mix.
Application of natural plastering
- Scrape surface with a sharp object like the edge of a trowel to create a texture on the wall,
- Wet the wall surface,
- Apply 3-5 cm of mud either by hand or using a trowel,
- After 10 minutes when it dries, go over it again with a glass bottle or a trowel,
- For finer final plaster, sift sand and clay using an inclined sifter. Mix 3:2 (sand: clay), then add straw. For a good sticky mix, let the straw soak in water overnight. The longer the better.
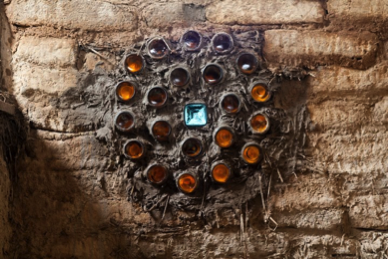
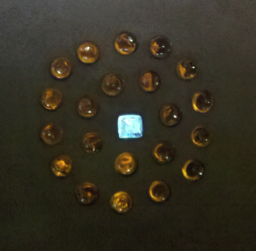
Building with glass bottles
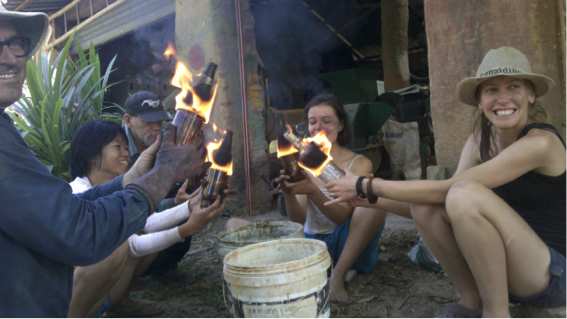
Using glass bottles in your adobe wall provides a creative, artistic finish. You can create beautiful artwork using full bottles, or you can cut glass bottles using a diamond cutter and fix them together for a more uniform brick shape.
Required tools: Diamond blade, 5-gallon bucket, twine, gasoline, file, vinegar, duct tape.
Steps:
- Make a scoring block to brace the glass bottle as you score it with the diamond blade
- Brace the bottle on the block and score at least one complete rotation using the blade
- Soak twine in gasoline and tie twine around the bottle just above the scored line, close to the top
- Light twine on fire. After about 10 seconds just before the fire goes out, dunk the flaming bottle in bucket of water. The bottle should break along the scored line,
- Use a file to dress up the edges, clean bottles with vinegar
- Do this with multiple bottles. Tape bottles together. Any tape will do, it will be hidden by the wall
- Make a bunch and get creative!
img Burning bottle wicks before dunking in a 20L bucket of water
How to make shiny plaster using glass bottles
You can also add fine glass particles for a shiny finish. To prepare a glass particle additive, put recycled glass bottles in a concrete mixer with fist-sized rocks and turn on the machine. The rocks pulverize the glass bottles and eventually return them to fine sand particles. Mix this additive in with the mortar as you plaster and it will add a beautiful shine to the wall.
Note: Make sure you use gloves when handling the glass particles – the granules are small but they can still cut you. Also note, when you put fist sized rocks into a electrical or gas powered machine, it can damage the motor. In this case, using a bicycle-powered cement mixer is a safe option.
How to make natural paints
In a bowl, mix 1 cup of tapioca flour (white flour will also do) with 1 cup of water in a bowl. Boil another 4 cups of water and slowly add the boiling water to the bowl. Stir as you pour. You can add sifted sand as a rough, base coat. Then add clay to the paint for a smooth finish. To add color, you can use natural pigments like turmeric, rust, colored clay or any ground flower.
Natural sealants
Linseed oil makes a great natural sealant. It can be expensive but is an excellent natural waterproofing sealant. When applying linseed oil, first add a coat of 100% oil. With each additional application, you can dilute the oil with water. For the second coat add half water and half linseed oil. After three or four coats, the surface will appear and repel water like linoleum.
Beeswax is another natural sealant option. Or, depending on your ethical point of view, using a synthetic waterproofing paint works well and is cheap and easy to find.
Some good rendering recipes to note:
8 parts sand + 1 part cement + 3 parts fermented cow manure (to make fermented cow manure, put manure in a bucket with water for 5-7 days).
Or 1 part clay + 4 parts sand + 5 parts fresh cow manure + hydrated lime. Lime protects from rain and cow manure protects from insects.
Earthbags
Earthbag building is one of the cheapest, quickest, easiest ways to build. Also called “super adobe”, rice-sack style bags are filled with dirt, laid in flat layers and strapped down with barbed wire. Like cob, building with earthbags has tremendous design flexibility and require very little knowledge to get started. Because the bags are movable and independent, earthbag structures are earthquake-proof. You can use rice sacks or look online for suppliers of long tubular sacks designed specifically for earthbag buildings.
Note: Use 20kg bags for a good width. 25kg or bigger sized bags are too wide. Turn each bag inside out to prevent the corners from filling with air. After you lay each layer of earthbags, use a “tamper” tool to flatten the bag. Then lay a line of barbed wire. Barbed wire provides just enough friction to bind each earthbag layer together.

Rammed earth
Building with rammed earth is another very structurally sound natural building technique. Rammed earth walls are waterproof and require no plastering. With rammed earth, you make forms of where you want your wall to go, and add dirt. You can add 5-10% cement to the mix to provide a stronger hold. One good mix ratio is 4 parts cement, 5 parts gravel, 6 parts sand and 13 parts sifted clay. However, earthen recipes can vary depending on the type of soil you have.
20cm is a good width for rammed earth walls. As you fill the form, add 30cm of dirt, then compress to about 20cm using a tamper. Repeat this until you reach the top of the wall. When you remove the form, the rammed earth looks like layered sandstone.
Bamboo
Bamboo is a beautiful, strong grass, which can be used as a building material. There are many types of bamboo ranging in thickness and strength.
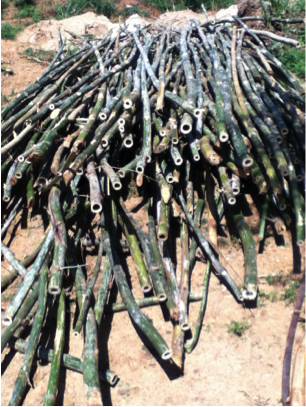
The best time to cut bamboo is at the end of the dry season. In Thailand, this is around April. If you are running short on time or it’s not the end of the dry season, you can cut the bamboo and let it cure for about a week. Then set the bamboo in place. When it dries, it will hold that position. Structurally this will work. However, the bamboo is still susceptible to termites. You can also soak the bamboo in a solution of borax salt or soak them in water to get rid of the sugars for better termite prevention.
At the Art of Living Permaculture site in India, volunteers cut the bamboo and let it sit in the sun for a few days, and then built a structure before the bamboo dried. The poles were flexible because they hadn’t completely dried out. The flexibility enabled the team to bend some of the poles into place when constructing the roof.
img Drying freshly cut bamboo for 1 week, Art of Living, India
Chip and slip (also called straw-clay)
Straw clay is a very efficient building technique with high insulation rating. The straw provides insulation and the clay absorbs moisture. When packed into 20cm walls, this material can have an insulating value 2-3 times to that of fiberglass. It is necessary to use a form for the wall to pack the material into. Chip and slip is similar to cob and rammed earth.
Cordwood
Cordwood uses wooden stumps (10cm or wider) like bricks and is held together with cob and mortar. Using a form to build with cordwood is optional. Imagine looking at a stack of wood logs where the gaps are filled with mortar. That’s cordwood.
Straw bale
Straw bale provides high insulation values for a building, about 2-3 times commercial fiberglass. This is a great method for temperate climates and is very easy to build.
Living homes
Living homes are another method to construct a house that grows over time. Often called, espalier or pleaching technique, is when you plant trees in the shape of the building you would like to grow. This technique can also be used to grow food hedges and food fences. As the plants mature, you train them to grow in different directions. Espalier is the horticultural and ancient agricultural practice of controlling woody plant growth by pruning branches to a frame so that they grow into a particular shape (http://en.wikipedia.org/wiki/Espalier).
img Willow pleaching
Other alternative natural building materials
You can also build using cardboard, wood palettes, plastic bottles, reeds or used shipping containers.
Unnatural building materials
Any material that requires chemical additives and processing is an unnatural building material. Cement, steel and synthetic paints are typical unnatural building materials used by natural builders. Using unnatural building materials can extend the life of a building by years, if done correctly.
When determining whether to use unnatural building materials or not, consider the reason, cost and time needed to finish a project. Evaluate how long the materials will extend the life of the building. For example at the Panya Project in Thailand, the community originally built toilets with a wooden floor. Over two years, the floor rotted from the moisture in the poo chambers. New toilets had to be constructed and the decision was made to use steel and concrete for the flooring.
Every person has different reasons and ethics when approaching unnatural building materials. Do what you want to do.
Ecological house design
An ecological house is a house, which utilizes as little energy as possible to maintain the house. Ecological homes are also built using local, natural materials. Consider the following aspects when designing structures:
- Aspect/orientation – Consider how your house will face the sun. It’s beneficial to position main elements of your site to face the sun. For example, in the northern hemisphere, point the opening of buildings or large windows to the south. In the southern hemisphere, face the opening of buildings or large windows to the north. This enables sunlight to enter the house throughout the day. A veranda or shade structure can also be built at the west side of the house to cool the house at night. Buildings with proper orientation can reduce 7-10% of energy consumption.
- Ventilation – Consider wind flow through the house.
- Natural lighting – Adding lots of windows, open spaces or sky lights are good ways to allow more light into your home.
- View corridor – Think about the spectrum of view you will have once the house is built. Look around the site of the building. What is nice to look at? Build the house to face that.
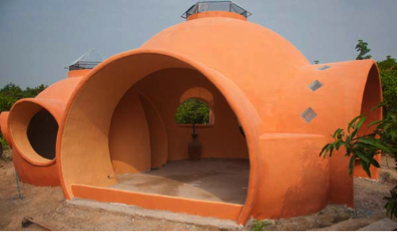
- Round walls/shapes – Consider building a round house for more unique and natural design. Note: As you’re constructing a round house, the walls don’t have much strength. The moment you complete the circle, the walls will turn to stone. Be patient, stay with it.
- Big hat, big boots – To prevent damage to earthen materials from rain include a .5-1m roof overhang and good foundation.
Insulated Greenhouses
- Build using cob or strawbales to regulate temperature.
- Build a pond to collect and store heat (water has high thermal mass and naturally store and release heat).
- Put a compost pile inside or keep rabbits, chickens, guinea pigs under tables inside. Heat from the compost pile and animals is contained in the room.
- Build heating ducts of cob throughout your house, attached it to a wood oven.
- Plant deciduous in front of big windows. They gain leaves in the summer which create shade and lose leaves in the winter to let sun into the house.
- Build a cellar or a pit to store food for winter food storage. The temperature is steady underground.
- Plant trees in an arc to create a suntrap. Once the trees mature, the arc retains heat from the day.
- Install ponds (in all climates) to regulate temperature of the soil and the air.
Tropical building strategies
- Build on stilts to prevent flooding around structures,
- Collect all rainwater for the dry season
- Build an outdoor kitchen and/or bathroom
- Steep roof for shedding rainwater (if using thatch)
Arid climate building strategies
- Central courtyards
Small windows
- Build underground
- Green roof
- Evaporative cooling
Unique building strategies
When designing buildings in earthquake-prone areas, consider constructing buildings with high sheer strength.
Pyramid home
A tetrahedron-shaped home divides the load among four points. When each point is anchored, the structure is as strong as a pyramid. If an earthquake ripples the ground, the points can each move independently without damaging the walls. Designed by Canadian architect Bernard Fredette at SuncampDR in Dominican Republic, www.suncampdr.org.
Dome home
A dome is the strongest structural shape for a building. The weight is evenly distributed throughout the structure. If an earthquake occurs, the building will distribute the weight and the structure will hold together. Steve Areen of www.steveareen.com/domehome/ built a dome home out of concrete blocks in Thailand. The project took him six weeks and cost 9000 USD.
Earthships
Earthships is a building technique/organization that uses only waste materials, i.e. tires, glass bottles reclaimed windows and doors. Pioneered by Michael Renyolds, a natural builder from Arizona, USA, Earthships are now building homes worldwide in disaster prone areas and offer building internships to learn the Earthships design. Watch Garbage Warrior for the story of Earthships or look them up online to learn more.
Pleaching/espalier
As mentioned earlier in this chapter, pleaching/espalier is a technique to plant trees in the space you want to grow them. Look at the section above for more information.
Parts of a house
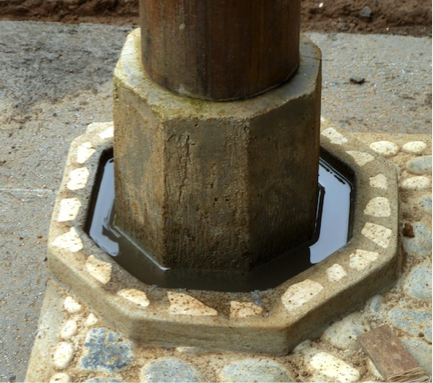
Foundation

Floors
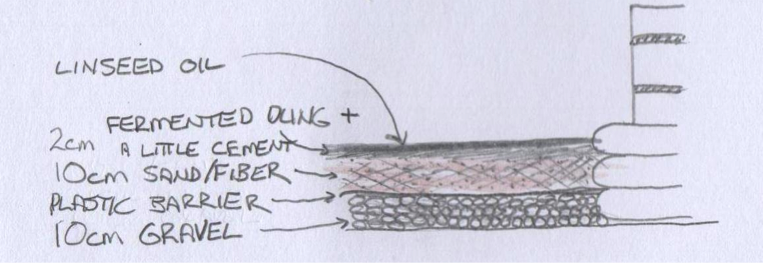
A natural floor is a good way to use mainly earthen materials. Here is one method for installing a natural floor:
Roofing
If you want to build a free-standing roof structure, consider a reciprocating roof style. This works best if the diameter of the house is less than 6m.
img Continuous spiral roof, Milkwood Permaculture, Australia
Roof material
Tin roof – Tin is a very common, available and relatively cheap roofing material found in most countries around the world. This material makes it easy to collect rainwater and will last years if installed correctly.
Tarp, fiber, shade-cloth – The Bamboo Center in Auroville, India innovated a lightweight, prefabricated roof structure that lasts years. To construct, build the roof frame on the ground, then wrap the frame with the three materials, first tarp, then shade-cloth and the natural fiber. The combination of the three gives a natural look to the roof and work together to combat damage from the sun.
Clay tiles – Clay-baked tiles are a great, long-lasting way to protect a building from rain. These tiles can be expensive and are heavy, so they will require a good roof structure.
Thatch roof – Thatch is dried straw. It creates a beautiful, natural roofing material. Check online for tips on weaving thatch. In many areas you can buy pre-made thatch for very cheap. When assembling a thatch roof, you want the roof to be as steep as possible, over 45º. The steeper the incline, the more water is shed from the roof, thus preserving the life of the material. If the roof is less than 45º, the roof won’t last more than one or two rainy seasons.